


This DIY bee hotel is a super simple way to help out the bees, and get the kids excited about nature at the same time. If your little ones love watching bees bounce from flower to flower, this is right up their alley.

This hands-on, slightly messy (but totally safe) craft is part science experiment, part creative project, and 100% fun. It’s a perfect weekend activity for curious preschoolers and their grown-ups. You’ll build something cool together, learn a little about nature, and do your part to help our buzzing buddies.
And the best part? You don’t need anything fancy. Just some basic supplies, a pinch of curiosity, and maybe a few giggles along the way. Ready to get started? Let’s dive into this bee-autiful adventure!
Why Build a Bee Hotel? Ecosystem Benefits Explained
Here’s something cool: not all bees live in hives or make honey. Some bees, like mason bees and leafcutter bees (resin bees), are what we call solitary bees. That means they don’t live in big groups like honey bees. Instead, each female bee finds her own little nest site to lay eggs, gather pollen and nectar, and raise her young all on her own. Total boss bee energy.
Solitary bees are some of the most important pollinators out there, especially in early spring, when flowers first start blooming and crops need a helping hand. But since they don’t have hives, they need safe spaces to build nests, stash food, and protect their babies (called larva) from predators, weather, and even other bugs like wasps that can do them harm.
That’s where a DIY bee hotel comes in! It gives different bee species a place to rest and raise the next generation.
Kids will love learning how some bees use nesting tunnels to raise their young, no hive required. As they build, they’ll explore how a simple shelter can protect bee larvae from things like pests or weather. Along the way, they’ll practice measuring, sorting, and thinking critically. Classic STEM stuff with a fun, nature-loving twist.
Bee Hotel DIY Kids Project
Once kids understand the why, it’s time for the how. Luckily, this project is super simple to pull together. A few basic supplies, a bit of supervision, and you’re good to go. Set up a workspace that can handle a little chaos (outside is perfect!), and let the building begin. Here’s what you’ll need:
Bee Hotel Supplies:
- 1 clean, dry aluminum can (any size)
- Construction paper (lots of colors – let kids pick their favorites)
- Duct tape (we used this one)
- Pencil
- Ruler (for measuring paper strips)
- A handful of sticks (small, dry twigs, reeds, or bamboo from your yard are perfect)
- Cardboard toilet paper rolls (two to four)
- String or yarn (about 2 feet)
- Scissors (safety scissors for little hands)
For Customization:
- Glue
- Paint and paintbrush
- Printed or plain duct tape
- Stickers
- Googly eyes, gems, or sparkly bits

Step-By-Step Instructions to Create an Easy DIY Bee Hotel
Let’s turn that plain ol’ can into a buzzing high-rise for bees! Here’s how to build your own bee hotel, step by step:
1. Prep Your Can
Start with a clean, dry aluminum can. Check the edges. If anything feels sharp, use a spoon to gently press the rim inward so it’s safe for little hands and bees!
2. Make It Bee-utiful
Wrap the outside in duct tape or let your kid go wild with stickers and paint. The brighter, the better – bees love flower vibes!

For more bee-inspired crafts, don’t miss this fun bee paper plate craft. It’s an easy and adorable project to help kids learn more about these important pollinators.
3. Cut the Paper Strips
Take a sheet of construction paper and line it up with the width of the can. Then cut several strips. These will become your pretend “straws,” just like the hollow stems and reeds real bees like to crawl into!

4. Roll the Tubes
Grab a pencil, stick, or something with a similar diameter to roll each strip into a tight tube.

Tape the end so it stays rolled. If you want to go the extra mile, you can fold or pinch one end closed before taping, but open-ended tubes still make a great start for bee-friendly fun.
These tubes act as nesting materials for cavity-nesting bees, who love to tuck themselves into small spaces just like this. Plus, it’s a great fine motor workout for kids!
Want to keep the STEM buzz going? Check out our full collection of hands-on science activities for kids, perfect for curious little builders and explorers.

5. Fill the Toilet Paper Rolls
Time to start building your bee bundles! Take an empty toilet paper roll and stuff it full of your paper “straws.” You want them packed in tightly so they don’t shift around.

Solitary bees like a snug, steady space. In nature, they often nest in plant stems, especially ones with soft centers called pithy stems, like those found in raspberry, sumac, or even wild rose.
Your paper tubes mimic those natural spots, especially when packed together. If you were using real stems, you’d want to make sure each one had a sealed end, like a node, to keep out moisture and give bees a safe back wall for their eggs.

You can mix colors, arrange them like a rainbow, or keep it simple, whatever makes it fun! Keep adding tubes until the roll is completely full and everything stays in place without shifting.
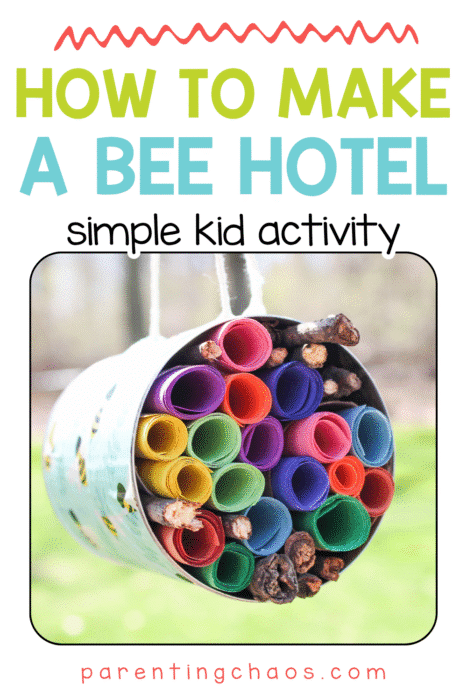
6. Pack the Can
Carefully arrange the filled rolls inside the can so they fit snugly. If there’s any extra space, add a few sticks from the yard or mix in dried stems from phragmites or honeysuckle.

These hollow pieces mimic the natural tunnels bees look for in the wild. A tight, gap-free setup helps block wind and keeps the inside dry. Just the way solitary bees like it.

7. Add a Hanger
Cut a piece of string about 2 feet long. Tape one end firmly inside the top of the can using duct tape, press it down well so it holds tight.

Then tie the loose ends together to make a loop. This gives you an easy way to hang your bee hotel on a branch or hook.

In nature, bees spend a lot of time searching for the right resources. You’re helping by offering them one more safe spot to call home!
8. Hang It Outside
Take your finished bee hotel outside and hang it somewhere calm and sunny. A spot that faces southeast is ideal. It catches the morning sun, which helps warm the hotel and get bees moving early in the day.

Try placing your bee hotel near blooming plants like sunflowers or bee balm so food is nearby. The more inviting the area, the more likely your buzzing visitors will check in!
After hanging your bee hotel, head outside with this nature color scavenger hunt to help kids notice the colorful plants and pollinators around them!
Please Share This DIY Bee Hotel
Your shares are how this site grows and I am sincerely grateful. Know a friend who’d like this? Please share it on Facebook or save it to your favorite kids’ activity board on Pinterest.